Whether you are a couple counting down the days until you say “I do” and wondering how the day will flow, or a budding photographer looking for a behind-the-scenes glimpse into shooting a wedding, this post is for you.
The ceremony is the absolute heart of a wedding day. It’s full of nerves, tears, laughter, and unpredictable moments. To give you a clear idea of exactly what to expect from us, and how we navigate the biggest moments of the day, here is our step-by-step guide to how we capture a wedding ceremony.
1. The Pre-Ceremony Prep (Arriving Early)
We don’t just show up as the music starts. We always arrive about an hour before our scheduled start time. This buffer is crucial for several reasons:
Scouting Locations: We walk the grounds to find the best spots for couples’ portraits and group shots later in the day.
Assessing the Light: We check how the natural light is falling in the ceremony space and adjust our settings accordingly.
Checking the Schedule: We always carry a printed schedule. This is our holy grail for the day, ensuring we know exactly where we need to be and when.
Meeting the Team: Whether it’s a registry office, a hotel, or a church, we always introduce ourselves to the venue managers and the officiant. We check for any specific restrictions, such as where we are allowed to stand or if flash is prohibited.
Lens Selection: We take a hard look at the room. If it’s a tight registry office, we ensure our wide-angle lenses are ready. If it’s a sprawling outdoor ceremony or a grand church, we make sure our longer zoom lenses are locked and loaded.

2. The Build-Up and The Procession
As the ceremony approaches, Emma and I divide and conquer. Emma will usually stay with the bride to capture the final moments of prep, while I head into the ceremony space to photograph the groom, the groomsmen, and the guests arriving.
Just before the bride walks down the aisle, I position myself at the front of the room, essentially right where the bride will stand next to the groom. This gives me a beautifully clear, head-on shot down the aisle as she makes her entrance. As the bride gets closer, I take a couple of steps back to give the couple their space to take in the moment.
3. The Vows (The “Yo-Yo” Technique)
During the ceremony, my goal is to be virtually invisible while still capturing every emotion. I use what I call a “yo-yo” approach, quietly moving between either side of the officiant.
This positioning is critical because reactions are just as important as the action. When one of you is reading your vows, I want to capture the other’s face as they listen.
A note for photographers: I always try to keep a respectful distance between myself, the couple, and the officiant. However, in smaller registry offices, I might be backed up against a wall, only a meter away from the couple. This is exactly why packing a wide-angle lens is non-negotiable, as a standard 35mm will simply be too tight for these spaces!

4. The First Kiss
Officiants are fantastic at giving subtle cues. They will often build up their tone of voice just before the first kiss, or they’ll give a quick glance or step to the side.
When this happens, I make sure I am standing central to the couple (usually right beside the officiant). I typically capture this moment at 35mm, bursting about 10 frames to ensure I don’t miss a single split-second of one of the most important shots of the day. Sometimes, I will go wider to 24mm, or even 20mm if I have it on me, to frame the couple while capturing the joyous reactions of the guests in the background.
Meanwhile, Emma is positioned at the back of the aisle, capturing the exact same moment from a beautiful, scene-setting angle.
5. The Signing of the Register
Legally, we are usually not allowed to photograph the actual signing of the register. We use this brief pause to step towards the back of the room and capture candid shots of your guests mingling, chatting, and shedding happy tears.
Once the official paperwork is complete, the officiant will usually give me a nod. I’ll head back to the front to capture the “mock signing.” We’ll do a lovely photo of the couple at the table, and then invite the witnesses in for a group shot. I typically use a 35mm to 50mm focal length here, taking a few steps back into the aisle to frame it perfectly.
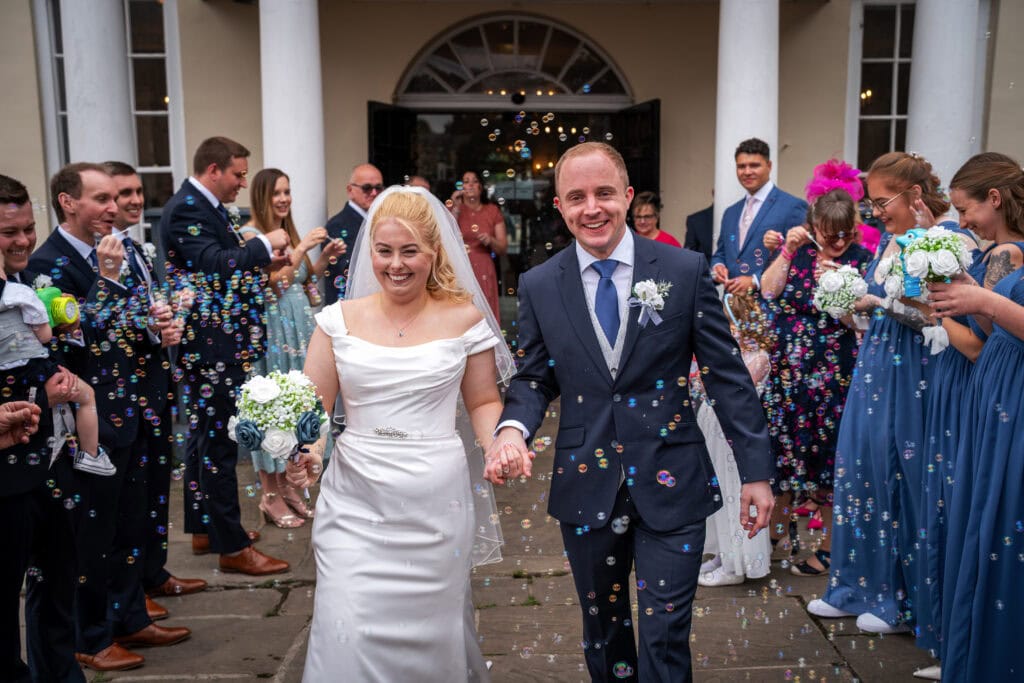
6. The Exit (Walking Down the Aisle)
For the big exit, Emma and I switch positions! I move to the back of the aisle, and Emma heads to the front, off to the side.
After the officiant says their closing words, the couple makes their triumphant walk back up the aisle. Depending on how long the aisle is, I usually start halfway down and physically walk backward ahead of the couple.
Why walk backward? Because excited guests often step out into the aisle to take their own smartphone photos, not realising a photographer is behind them! By staying slightly ahead of the couple, I ensure nobody steps in the way and ruins those joyous, critical exit shots.

7. The Confetti Shot
Once you’re out the door, we highly recommend doing the confetti shot almost immediately. All of your guests are already grouped together, their energy is high, and it makes arranging the shot incredibly seamless. (Keep an eye out, I’ll be doing a dedicated blog post entirely on nailing the confetti shot very soon!)
What’s in Our Gear Bag for Ceremonies?
For the photographers reading, our ceremony coverage is 99% shot using the following setup:
My Setup (Dual Harness)
Camera Bodies: 2x Sony a9ii
Primary Lens: Tamron 35-150mm f/2-2.8. This is incredibly versatile and covers almost the entire ceremony without needing to swap lenses.
Secondary Lens: Sony 24mm f/1.4 GM. This is mounted on my second body for wide shots and tight spaces.
Low Light Alternatives: If a venue is exceptionally dark, I will swap the Tamron out for a Sony 50mm f/1.4 or a Viltrox 85mm f/1.4 to let in more light. At that point, I will also likely introduce flash or static video lights if the venue permits.
Emma’s Setup
Camera Body: Sony a7iv
Primary Lens: Tamron 28-75mm f/2.8 as a fantastic multi-purpose lens for dynamic shooting.
Long-Distance Alternative: If we are shooting in a very long church, Emma will switch to the Sony 135mm f/1.8 GM to get incredible compression and reach from the back of the aisle.
Our Go-To Camera Settings
While some photographers insist that you have to shoot in full manual mode to be a professional, I choose a semi-automated approach. This allows me to focus on the moments unfolding in front of me rather than constantly fiddling with dials. I use this exact setup for 90% of the wedding day, only really changing to manual when I introduce flash:
Aperture Priority Mode: This lets me dictate the depth of field (how blurry the background is) while the camera handles the rest.
Exposure Compensation Dial: Because I shoot in Aperture Priority, I actively use the exposure compensation dial. This is an absolute lifesaver when I get lots of bright highlights pouring in through the windows and need to adjust the exposure quickly on the fly.
Auto Shutter Speed (with limits): I set my shutter speed to automatic but enforce a minimum limit of 1/250sec. This ensures the camera never drops to a speed that would cause motion blur.
Auto ISO: I limit this to a range of 100 to 6400. This gives the camera enough flexibility for changing light but prevents the images from getting too grainy in the shadows.
Autofocus: On our Sony bodies, I stay in AF-C (Continuous Autofocus) and use Single Point Expanded Tracking. This makes it incredibly easy to lock onto a moving couple and trust the camera to keep them sharp.

FAQs
Can we get photos of the actual signing of the register?
Due to legal restrictions in the UK, we aren’t permitted to photograph the actual legal document being signed. However, we always do a “mock signing” immediately afterward with a dummy register or a blank page, so you still get those beautiful, traditional shots!
What happens if our venue is really dark and doesn't allow flash?
Don’t worry! This is exactly why we use professional-grade cameras and lenses that open up to f/1.4. Our gear allows us to shoot in incredibly low light without being disruptive, capturing the natural ambiance of your venue perfectly.
How do you handle guests stepping into the aisle with their phones?
Communication and positioning are key. We usually start halfway down the aisle for the exit walk so we are always ahead of the guests’ sightlines. If needed, a gentle, polite smile and a quick point of the camera are usually enough to let guests know we need the space.
Do you use silent shutter during the ceremony?
Absolutely, if the lighting works. With the Sony a9ii, the electronic shutter is completely silent and band-free in natural light, meaning we can capture the vows and the quietest moments of the ceremony without making any sound. However, if there is tricky lighting in the room, sometimes we have no choice to use traditional mechanical shutters to stop banding in the photos, but they are still fairly quiet compared with older DSLRs so we don’t worry too much.